It’s no coincidence that many programs using artificial intelligence techniques are open source and thus completely free. This is because the early approaches originated in academia, where free licences for software are common practice in order to promote collaboration and further development.
Here, however, it is not about frameworks and libraries for forms of AI, but about tangible and useful applications of artificial intelligence for your own computer. The term AI encompasses various methods such as neural networks, machine learning, deep learning, or natural language processing. In the following compilation, all these approaches are represented.
Further reading: How to make AI art
The models matter
The various approaches to pattern recognition, machine-processed decision trees, and automation of tasks are built on training data and models that are already ready. The availability of this data is one of the reasons why useful AI techniques are available in freely available software today at all.
Models generally take years to develop, and there are often terabytes of raw data to evaluate. But with the increasing computing power of common PC hardware, the development of AI models and the analysis of training data has accelerated in recent years, making it possible for smaller research teams.
The following compilation is about the practical benefits, i.e. the implementation of methods primarily in free software for Windows, which show well how far the technology has now progressed without high installation costs.
This is also thanks to open source developments — because with Pytorch, a deep learning framework from Facebook and Microsoft has been available since 2016, which has made a name for itself primarily in research and in free software projects with its APIs for Python and C++. Tesla’s Autopilot, among others, is also based on it.
The second big popular and free framework is Tensorflow, which comes from Google and delivers a tight binding to the Google Cloud, but also many libraries for personal use.
It is these two frameworks whose artificial intelligence mostly flows into the programs presented here via the connection of algorithms and data models, or was crucial in their development.
Final 2x – Enlarge image sizes
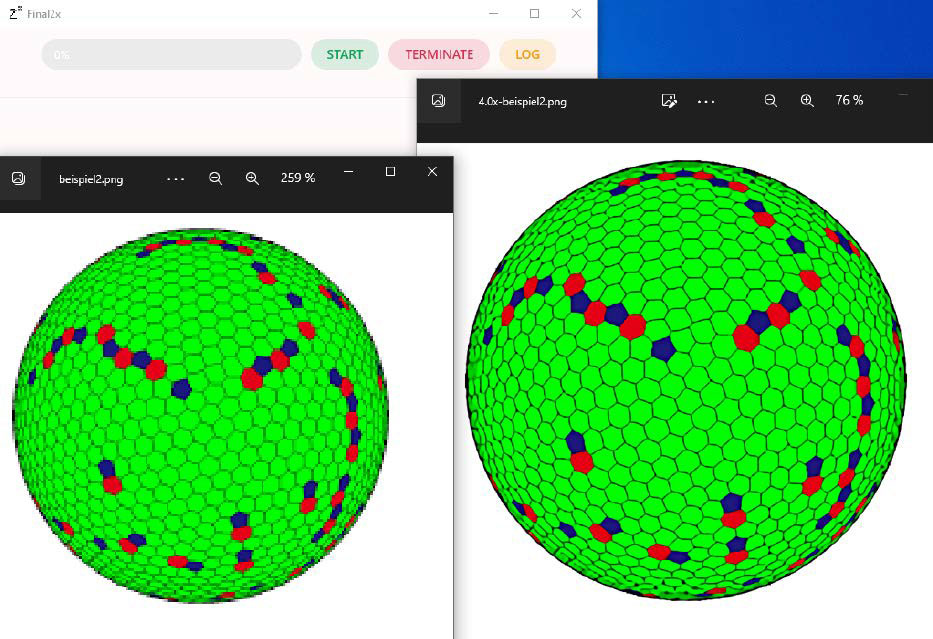
Well enlarged: Final 2x runs with any CPU and GPU. This pixelated graphic (left) has been enlarged to four times its original size (right) by the algorithm Waifu 2x.
IDG
Scaling bitmap graphics by merely enlarging their pixels always leads to a severe loss of quality. With Final 2x, enlarging bitmaps does not have to be lossy. The program Final 2x succeeds in upscaling graphics and smoothing them down to the last detail with the help of neural networks and the models supplied.
With the algorithms Real Cugan, Real Esrgan, Waifu 2x and SRMD, Final 2x provides four ways to scale images for the best results. The program can also significantly improve pixelated photos in JPG format with noise and strong artefacts.
Installation: Final 2x is also at the beginning of our useful tools collection because it is very easy to install under Windows and then immediately invites you to experiment successfully. There are also no special hardware requirements, because the neural networks and algorithms used in Final 2x run on Nvidia, AMD, and Intel chips. An integrated GPU is also enough.
As with all AI and neural network tools, however, the same applies here: A lot of RAM helps. For Windows, the developer provides the convenient installer Final2x-windows-x64- setup.exe (260 MB) on his Github page, which completes the setup with just a few clicks.
Hereʼs how it works: After starting, Final 2x presents an input field that accepts those image files in JPG or PNG format that it is to upscale by dragging and dropping. A click on the cogwheel symbol at the bottom left opens a page with settings. Under Device, the CPU/GPU for the calculation can be selected, if several are available.
The Model determines the image quality. The algorithm Real-ESRGAN is very well suited for photographs, while Waifu 2x is specialized for drawings. The scaling factor is determined by the Custom Scale field. It is also always advisable to activate the option TTA in order to obtain well-denoised results.
In the main window, Start begins the calculation, which can take several minutes for complex images.
Meshroom – 3D scanner for smartphones
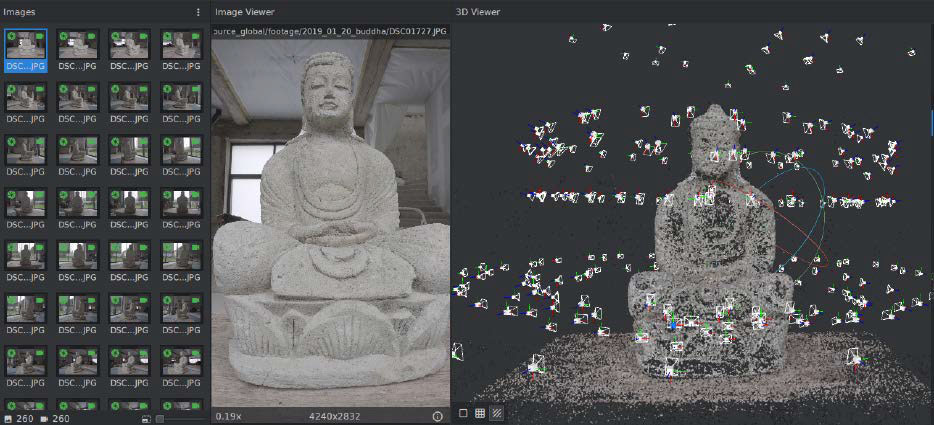
Welcome to the three-dimensional world: Meshroom creates a 3D grid from photographs of real objects for further processing in CAD programs and 3D models such as Blender.
IDG
A 3D scanner scans real objects with lasers and creates a file from the data for further use in CAD and animation programs. What sounds very complex is actually possible on a small scale with conventional smartphones or digital cameras and the free software Meshroom. It is based on the photogrammetric libraries of the developer Alicevision, is available under an open source license, and for Windows (64 bit). From the analysis of image series, it calculates the shape of a photographed object and creates a grid file.
Installation: Because of the Cuda interface required for calculations, Meshroom requires an Nvidia graphics card with support for at least Cuda 2.0. The table here shows which cards this applies to. The Cuda drivers from Nvidia for Microsoft Windows have a download size of 3GB.
Once the Nvidia hardware is set up, you can install Meshroom (1.3GB). With AMD graphics cards and Intel chips, Meshroom only works in the less precise sketch mode. Those with patience for calculations can test an alternative version of Meshroom without Cuda.
This is how itʼs done: When photographing the object to be scanned, it is important that it is as detached as possible in an empty room. Dozens of photos are needed from each side at different angles with a high depth of field and without blurring. It is important not to use an image size of more than 10 megapixels. The files are then dragged into the left-hand Images area in Meshroom to start the calculation, which takes a few hours even on Nvidia cards.
For further optimization of the mesh, 3D software such as the free program Blender is then recommended.
Kdenlive – Object tracking via AI
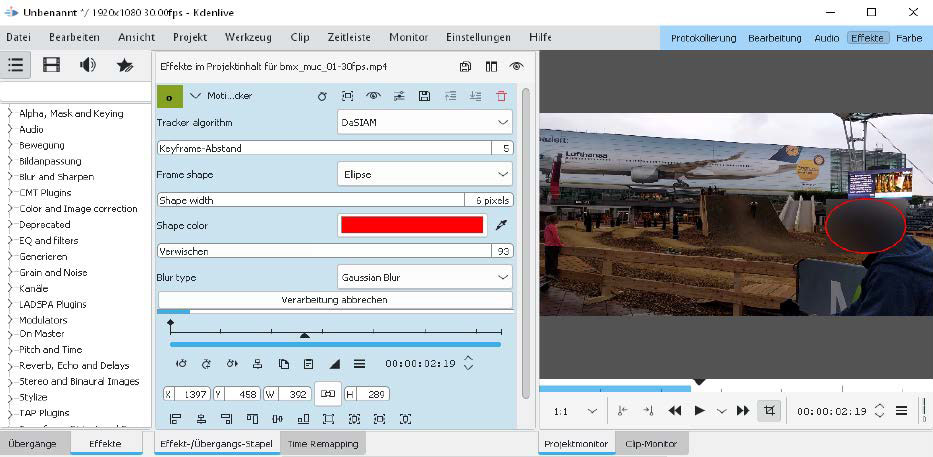
Tracking an object: The motion tracker “DaSIAM” in the newer versions of the video editor works with KITechniques and can, for example, make faces unrecognizable by blurring.
IDG
This free video editor has been able to come up with AI aids for two years now. Motion tracking, i.e. automatic object tracking in video clips, can provide recognized motifs with a mask and then apply targeted effects to them. This is useful, for example, to pixelate certain objects in a video clip.
Installation: Kdenlive is available as open source for Windows in 64 bit as a setup file (100MB) and is thus quickly installed. In addition, the model data for the motion tracking algorithm are now added. These are three files “dasiamrpn_ kernel_cls1.onnx“, “dasiamrpn_kernel_r1.onnx“, and “dasiamrpn_model.onnx” from the Kdenlive developers. All three files must be placed in the installation directory of Kdenlive. To do this, enter the address %AppData%/kdenlive in the address bar of Windows Explorer and create a new subfolder called opencvmodels. The three downloaded model files are then placed there.
This is how itʼs done: In Kdenlive, the motion tracker is available as an effect. To use it, place an imported clip from the list at the top left in the timeline below, switch to the Effects tab in the middle menu bar and select Alpha, Mask and Keying — Motion Tracker there. Dragging the effect onto the desired clip opens the settings for the effect and displays a red square in the preview window. In the settings, the type DaSIAM should be selected as Tracker algorithm. In the timeline, go to the first frame, place the red selection frame around the object and then click on Analysis to calculate the keyframes around the object. Pixelation, for example for faces, can also be selected immediately.
Spleeter – Splicing music into tracks
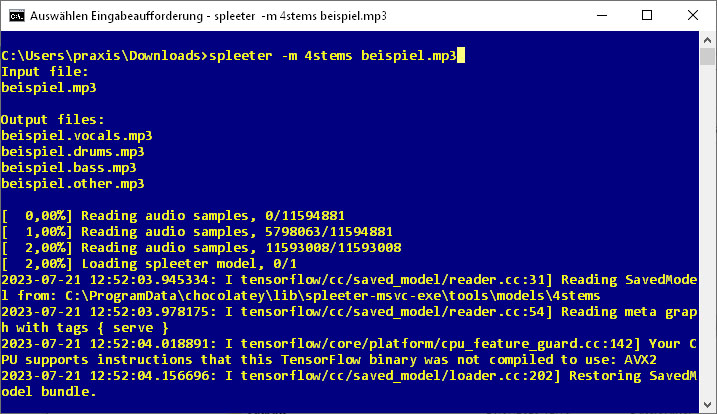
Skilfully deconstructed: Spleeter is a command-line tool that uses AI and extensive models to break down music files in MP3 format into individual tracks with isolated instruments.
IDG
This is how ready-mixed pieces of music become individual tracks again: The AI tool Spleeter already received a lot of attention two years ago after its first presentation. It can divide music in MP3 format into two, four, or five individual tracks using pre-trained models.
Spleeter recognizes categories such as vocals, bass, drums and rhythm section. The command-line tool uses the AI library Tensorflow to analyze the data stream in music pieces and the encoder Ffmpeg to separate the isolated tracks into individual MP3 files.
The AI tool and the training of the models come from the French streaming service Deezer, which was allowed to use the enormous, licensed catalogue of pop music as analysis material for pattern recognition. This training data is also available for free private use, but must be installed separately.
Installation: Thanks to its popularity, there is a Windows version of Spleeter that saves the tedious installation of the individual Python program components. This compact port for Windows is available via the package manager Chocolately, which first waits to be set up. To do this, first go via the Start menu to the Windows Power Shell, which opens with a right click and the option Run as administrator. In this command line, the command:
Set-ExecutionPolicy AllSignedenables the execution rights with the entry “j”. Then the command:
Set-ExecutionPolicy Bypass -Scope Process -Force; [System.Net.ServicePointManager]::SecurityProtocol = [System.Net.ServicePointManager]::SecurityProtocol -bor 3072; iex ((New-Object System.Net.WebClient).DownloadString('https://chocolatey.org/install.ps1'))installs the Windows package manager Chocolately.
Then the package manager can install Spleeter in the Powershell with this input:
choco install spleeter-msvc-exeNow the installation of the training models is necessary. For this purpose, the batch file “download_models.bat” is used in the newly created directory “C:\ProgramData\chocolatey\lib\spleeter-msvc-exe\tools\models”, which is also called in the Powershell and downloads about 1.2GB of data — no small matter. Finally, Spleeter requires the installation of the Visual C++ Redistributable from Microsoft.
This is how itʼs done: Once all the steps have been completed, you can continue in the Powershell or in the command prompt. The call:
spleeter.exe datei.mp3splits an existing MP3 file in the current directory into vocals and instruments, which it places in the folder as individual MP3 files. This is the simplest application example, which also takes only a few seconds of computing time on a current PC with average performance. In typical pop music, however, Spleeter recognizes additional tracks for isolation, such as drums and bass.
spleeter.exe -m 4stems datei.mp3In this example, Spleeter uses its pattern recognition to search for four individual tracks in a piece of music, namely vocals, bass, drums, and rhythm/accompaniment. The calculation takes a little longer until these tracks are written to the working directory as individual MP3 files.
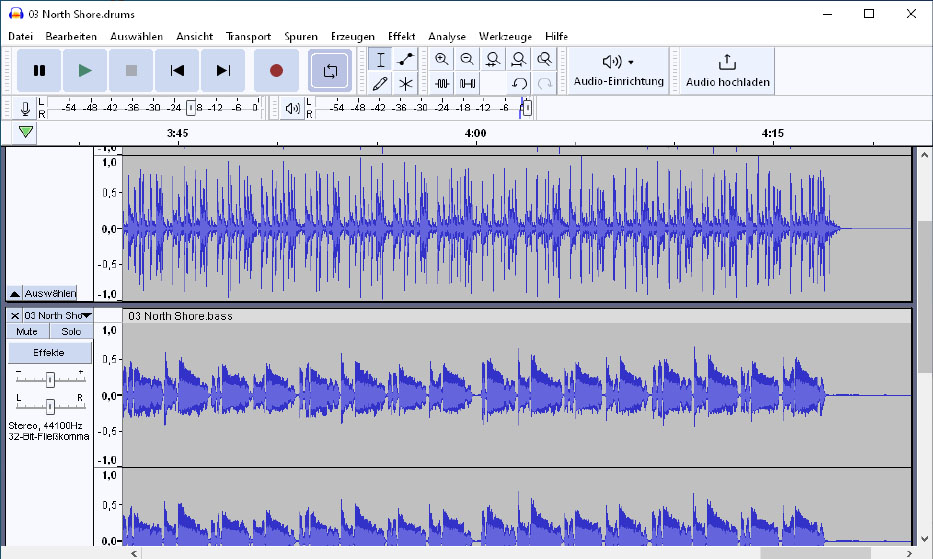
A look at the tracks created in the audio editor Audacity: Spleeter works very precisely in separating instruments and vocals, but cuts off high frequencies in the process.
IDG
If in the piece of music at hand the accompaniment has a strikingly unique feature, Spleeter can also use this command to split it into five tracks, which works best with vocals, bass, drums, piano, and rhythm section:
spleeter.exe -m 5stems datei.mp3Skilfully deconstructed: Spleeter is a command-line tool that uses AI and extensive modelling to split music files in MP3 format into individual tracks with isolated instruments.
Microsoft Edge – Enhance images
With its own data centers be
Login to add comment
Other posts in this group


Microsoft recently released preview updates for Windows 11 and also a
TL;DR: For a little while longer, you can score a De

Ditch the multiple chargers and opt for an Anker charging station; it
If you’re on the hunt for a new graphics card, you’re likely looking