Knowing how to screen record Windows 11 is necessary, especially when you want to perform a software task, clip gameplay highlights, capture online classes, etc. Luckily, many screen recorder programs are available for Windows 11 PCs and laptops, including inbuilt tools (Game Bar, Snipping Tool) and professional third-party software (EaseUS RecExperts, OBS). Here, we will explore these screen capture software to optimize Windows 11 screen recording, empowering you to produce high-quality recordings for any purpose easily.
For your convenience:
- If you want to find professional video recording software to perform Windows 11 screen recording, tools like EaseUS RecExperts and OBS are good options. They can easily handle various recording tasks, but OBS is more suitable for professionals.
- For those who simply want to record screens in Windows 11 without any software, built-in programs (Xbox Game Bar and Snipping Tool) can meet your needs.
Record Windows 11 screen and sound in high quality
- Difficulty: Super easy – With the on-screen instructions and simple UI, this tool is easy to operate without any tech knowledge.
- Effectiveness: High – It offers many advanced recording tools for various recording tasks, and exports high-quality recorded files. Plus, it provides free and pro versions for different users.
- Limitations: Like most third-party applications, its free version only lets you save 1 minute of your recording. If you are a light user, that’s enough.
EaseUS RecExperts is an ideal Windows 11 screen recorder with audio for those who want to create high-quality video clips easily and quickly. This professional Windows capture software offers various recording modes to meet almost all users’ needs, including game recording, protected video recording, screen and sound recording, flexible screen recording, and more. You can also use it to screen record Windows 10 with audio if needed.
While recording, you are able to use the real-time annotation tools to add text or draw something on your screen. Plus, it can record up to 4K video resolution on your desktop screen and export it in various formats. Last but not least, it will leave no watermark on any of your recordings!
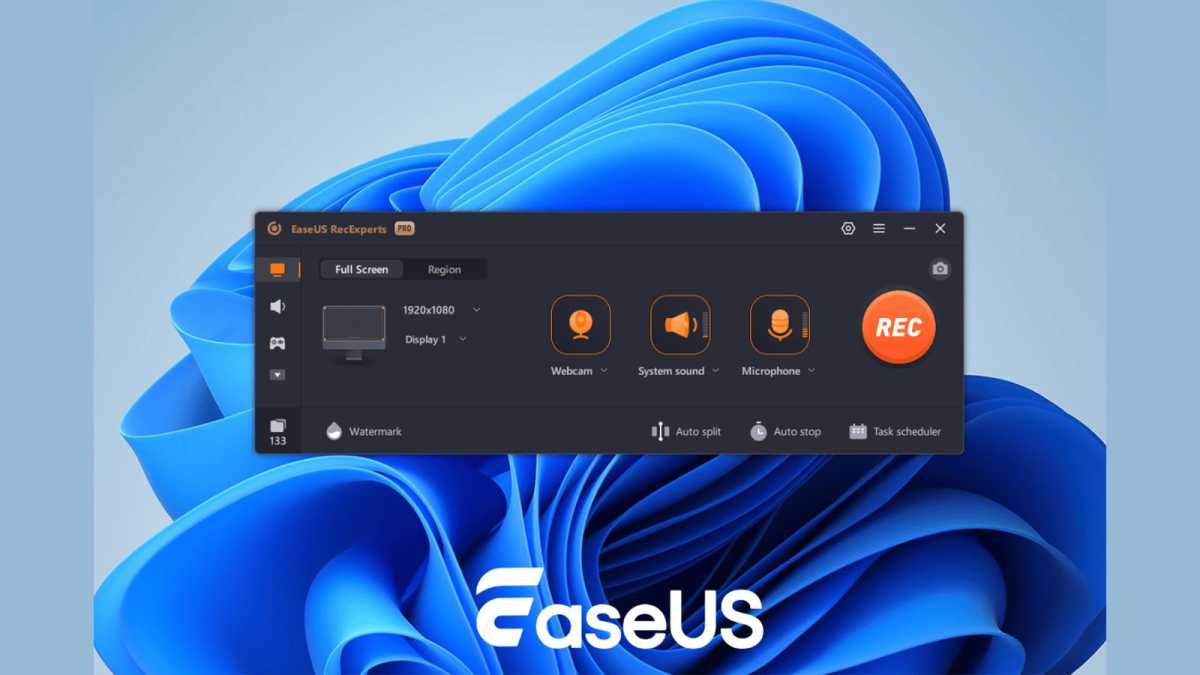
Step 1. Download and launch it on your desktop, and you will see a simple interface. To make a screen recording, choose the Record screen icon on the left panel to continue.
EaseUS
EaseUS
            <div class="scrim" style="background-color: #fff" aria-hidden="true"></div>
    </div></figure><p class="imageCredit">EaseUS</p></div>
Step 2. Now, you can select your recording area. If you want to record the entire screen, click Full Screen. If you prefer to customize the recording range, select the Region option.
If you have a webcam, system sound, or microphone recording need, you can turn on the corresponding options respectively.
Step 3. To get high-quality recorded video clips, you can also click the gear icon to adjust recording parameters, like file path, video quality, shortcut keys, and so on. Once everything is ready, click REC to start recording.
Step 4. Finally, when your screen activity is over, click the stop button. You can preview your recorded videos by clicking Recordings. You can also edit your video clips here by trimming, adding opening credit, etc.
Record customized Windows 11 screen exclusively with the Snipping Tool
- Difficulty: Easy – It has a neat interface and a single recording function.
- Effectiveness: Medium – It lets you record any region on your screen and export recordings in a common format (MP4) for sharing.
- Limitations: You cannot adjust recording parameters like format, resolution, etc. And the recording shortcuts are not available.
For Windows 11 users, the Snipping Tool is not only a tool for taking and editing screenshots but also a free Windows 11 screen recorder. This freeware offers a recording feature that lets you capture any region on your desktop by drawing a box. That means you can use it to record full or partial screen flexibly. If needed, you can even capture both audio (microphone or system sound) and screen simultaneously on your Windows 11 desktop.
However, to record the Windows screen with the Snipping Tool, your Windows operating system should be 22621.1344 or higher. You can click Settings > System > About to check the details.
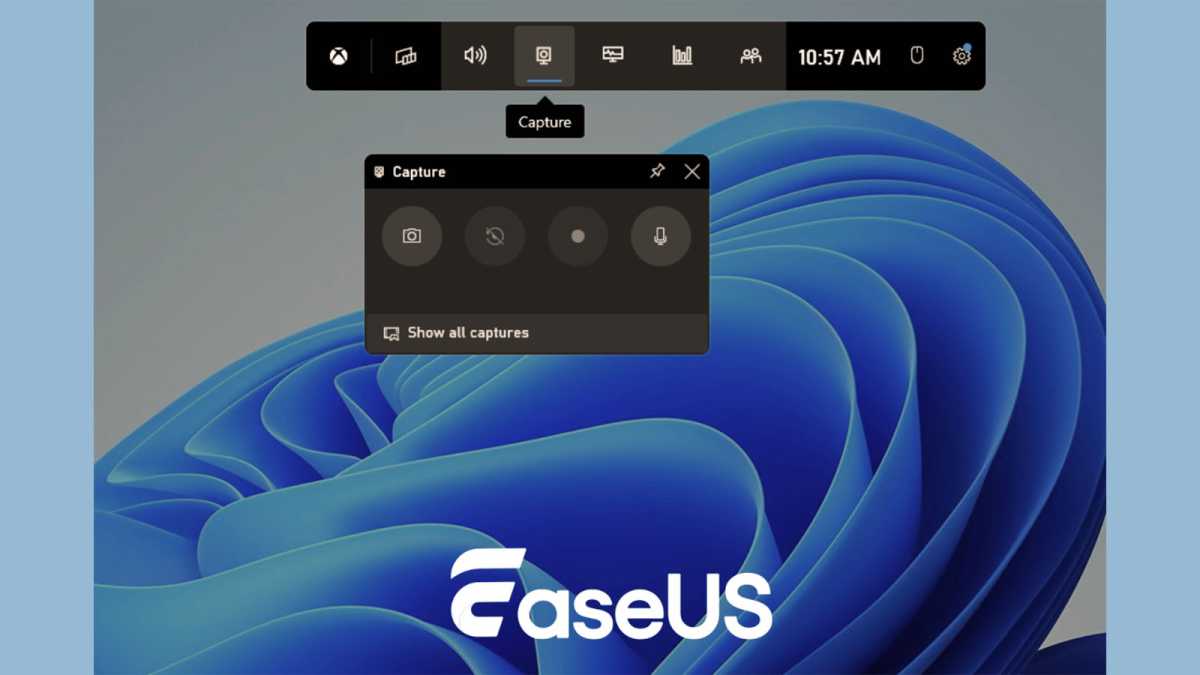
Step 1. Enter Snipping Tool in the search bar and click on the result to bring up this free Windows 11 screen recorder.
Step 2. On the toolbar, choose the Record option (which looks like a camera). Next, click New to select the area you want to record.

EaseUS
<div class="lightbox-image-container foundry-lightbox"><div class="extendedBlock-wrapper block-coreImage undefined"><figure class="wp-block-image size-large enlarged-image"><img decoding="async" data-wp-bind--src="selectors.core.image.enlargedImgSrc" data-wp-style--object-fit="selectors.core.image.lightboxObjectFit" src="" alt="Using the snipping tool" class="wp-image-2305164" width="1200" height="675" loading="lazy" /></figure><p class="imageCredit">EaseUS</p></div> </div></figure><p class="imageCredit">EaseUS</p></div>Step 3. Once the recording region is selected, you can flexibly choose to capture the Windows 11 screen with your system sound or microphone audio simultaneously.
Step 4. When you are ready, click Start to perform the screen recording activity. Once you stop the recording, the recorded video file will start playing automatically in a Snipping Tool preview window.
Capture Windows 11 desktop directly via Game Bar
- Difficulty: Easy – You can open and use this tool with a few shortcuts.
- Effectiveness: Medium – It supports recording a single Window and audio on your Windows 11 desktop and exporting files in HD quality.
- Limitations: You can only record screens for up to 4 hours. And it cannot record File Explorer and Windows desktop.
Another free Windows 11 screen recorder is the Xbox Game Bar. Like the Snipping Tool, it is also pre-installed on your operating system. With its aid, you can capture Windows 11 screens on a PC or laptop for up to 4 hours with just a few shortcuts and then export them in HD quality. Better than the Snipping Tool, Game Bar allows you to adjust the quality, frame rate, and hotkeys for your recording. However, you cannot customize your recording region.
Step 1. Press the Windows icon + G keyboard shortcut to open the Xbox Game Bar on your Windows 11 PC or laptop. Or you can enter the Xbox Game Bar in the search bar and select it in the menu.
Note: If the Game Bar is not showing up, go to Settings > Gaming > Xbox Game Bar and enable the feature.
Step 2. Next, you will see a floating toolbar with various icons. Click Settings to adjust your recording parameters, such as choosing the sound source and customizing shortcut keys.
Step 3. Return to the floating toolbar and select the Capture option. Then, click on the Start recording button or press the Windows + Alt + R hotkeys to begin your Windows 11 screen recording directly.
Login to add comment
Other posts in this group

Microsoft has added an OCR function (Optical Character Recognition) t

If you’re reading this anywhere outside of China, you probably haven’