NordVPN is not only one of the top VPNs on the market, but a subscription to the service gives you a ton of great features as well. But not all of the best features are commonly known or ready to go right out of the box. Thankfully, with just a little bit of knowledge and a few minutes of your time, you can have the VPN up and purring with ease.
Below I’ll show you my top five settings that I think everyone should change in NordVPN to get the most from their subscription. These tweaks will help you optimize your privacy and security, increase connection speeds, and take full advantage of the powerful utilities Nord has to offer.
While I highly recommend NordVPN, if you’re interested in other great services, be sure to check out our list of the best VPNs for even more options.
Turn on the Killswitch
NordVPN’s Kill switch is a must have feature when using the VPN.
NordVPN’s Kill switch is a must have feature when using the VPN.
Sam Singleton
NordVPN’s Kill switch is a must have feature when using the VPN.
Sam Singleton
<div class="scrim" style="background-color: #fff" aria-hidden="true"></div>
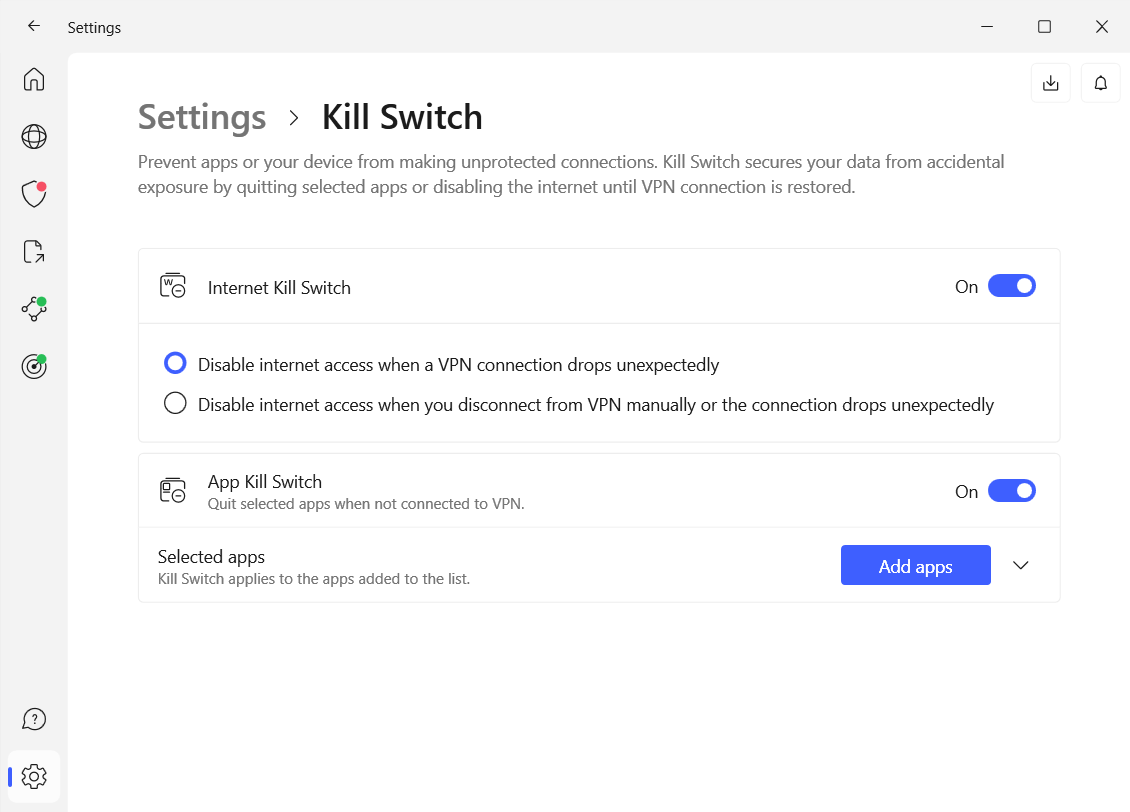
</div></figure><p class="imageCredit">Sam Singleton</p></div>This is an easy one and something that I recommend not just for NordVPN users, but all VPN users in general. A killswitch is a fail-safe way to ensure your privacy remains intact at all times while using a VPN.
The killswitch feature will automatically disable your internet access should the VPN connection drop unexpectedly. This prevents your personal data from being exposed in the accidental event that your VPN fails.
To turn this on with NordVPN, simply open up the settings menu and click the Kill Switch feature. Then make sure to toggle the Internet Kill Switch to “On.” You can also activate the App Kill Switch instead if you prefer for only specific apps to be disabled during a disconnection rather than your entire internet.
Make sure NordLynx is your automatic protocol
Stick with NordVPN’s NordLynx protocol for the best mix of speed and security.
Stick with NordVPN’s NordLynx protocol for the best mix of speed and security.
Sam Singleton
<div class="lightbox-image-container foundry-lightbox"><div class="extendedBlock-wrapper block-coreImage undefined"><figure class="wp-block-image size-full enlarged-image"><img decoding="async" data-wp-bind--src="selectors.core.image.enlargedImgSrc" data-wp-style--object-fit="selectors.core.image.lightboxObjectFit" src="" alt="NordVPN" class="wp-image-2353553" width="1024" height="736" loading="lazy" /><figcaption class="wp-element-caption"><p>Stick with NordVPN’s NordLynx protocol for the best mix of speed and security.</p>Sam Singleton
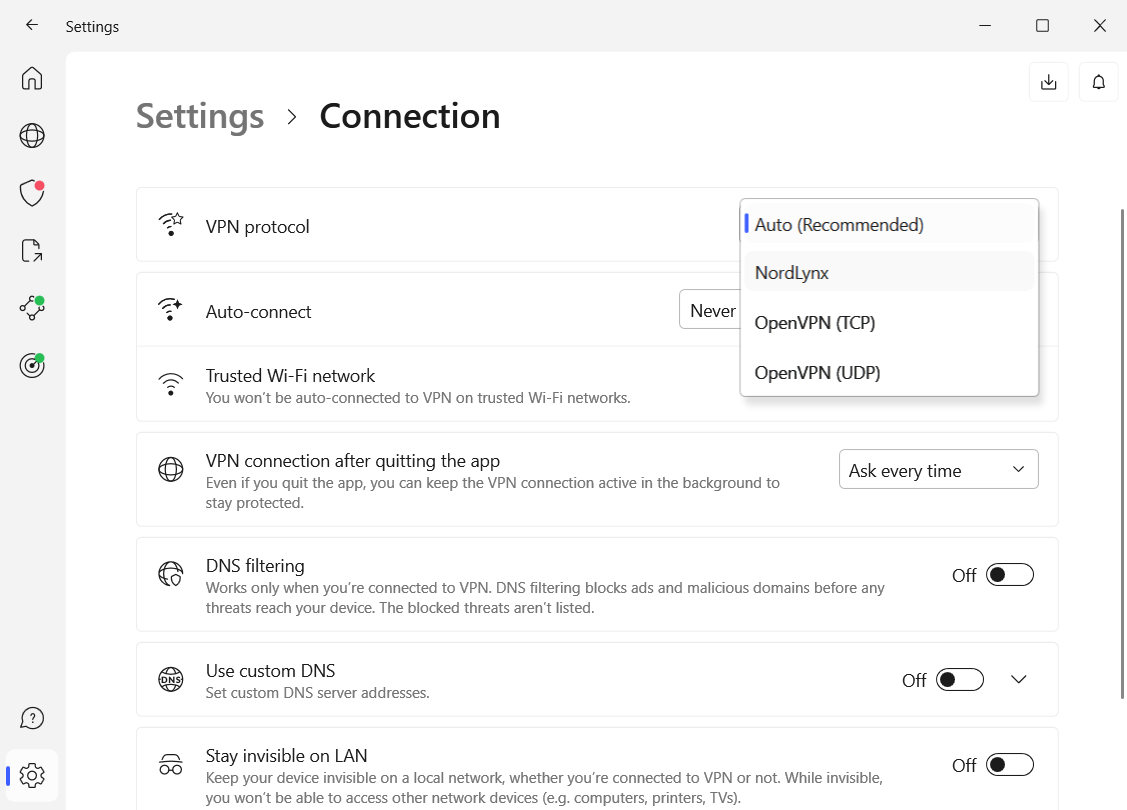
</div></figure><p class="imageCredit">Sam Singleton</p></div>VPN protocols play an important role in the speed and security of your connection. Think of them like the traffic laws and road map guiding your traffic through a VPN tunnel.
Most VPN providers offer a few protocol options, but you’ll generally want to stick with WireGuard as it’s the newest and provides a great combination of speed and security. NordVPN has gone one step further by making their own proprietary version of WireGuard, which they call NordLynx. Nord supposedly added a double Network Address Translation system to WireGuard in order to overcome any privacy vulnerabilities in the original protocol.
When you download NordVPN, NordLynx is automatically set as the default protocol. However, if you want to double-check or change the protocol it’s a straightforward process. Click on the “Settings” menu on the NordVPN home screen and then click “Connection.” Here you’ll find a drop down menu for “VPN Protocol”. Simply select “NordLynx” in this menu and it will now become your default protocol for all connections.
Take some time to setup Threat Protection
NordVPN’s Threat Protection feature provides tons of great security tools that you should be using.
NordVPN’s Threat Protection feature provides tons of great security tools that you should be using.
Sam Singleton
<div class="lightbox-image-container foundry-lightbox"><div class="extendedBlock-wrapper block-coreImage undefined"><figure class="wp-block-image size-full enlarged-image"><img decoding="async" data-wp-bind--src="selectors.core.image.enlargedImgSrc" data-wp-style--object-fit="selectors.core.image.lightboxObjectFit" src="" alt="NordVPN" class="wp-image-2353555" width="1024" height="735" loading="lazy" /><figcaption class="wp-element-caption"><p>NordVPN’s Threat Protection feature provides tons of great security tools that you should be using.</p>Sam Singleton
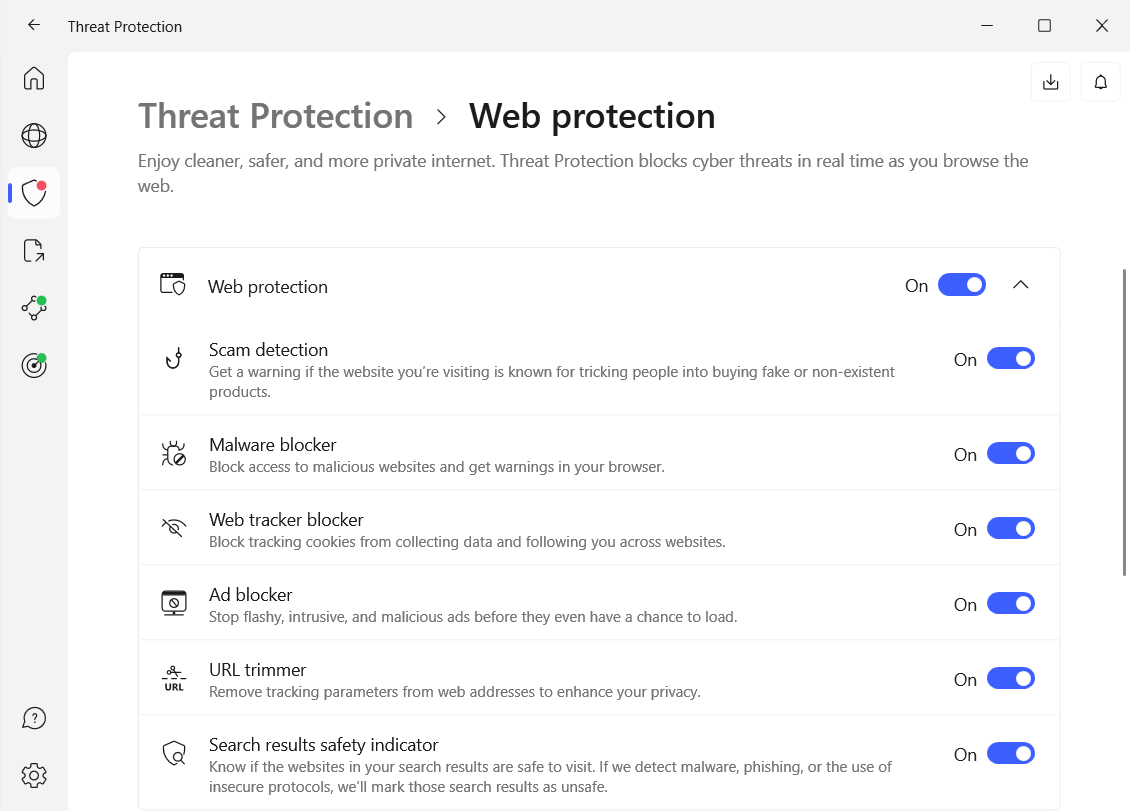
</div></figure><p class="imageCredit">Sam Singleton</p></div>NordVPN has expanded into more than just a simple VPN connection. It now offers a whole host of great security features such as ad- and tracker-blocking, malware protection, and more. Instead of purchasing a separate program to protect against each of these threats, I recommend just letting the included Threat Protection features in Nord keep you safe.
To get to the Threat Protection screen click on the shield icon on the left bar of the NordVPN home screen. You’ll see options for “Web protection”, “File protection”, and “Vulnerability protection” here. You can click the “View activity and customize” link below each option to explore more settings.
It’s absolutely worth taking the time to set up your desired protections with each of these three options. While I personally recommend that you turn on all protections, if you don’t want everything then I would at least turn on the Malware blocker, Web tracker blocker, Ad blocker, and File protection. These will all go a long way towards making your browsing even more secure.
Set your apps up with Split tunneling
Login to add comment
Other posts in this group
Anker remains one of our preferred sources of power banks, USB-C hubs

Stop us if you’ve heard this before: Microsoft encourages you not to

Who needs a smart home hub you can snag cheap Wi-Fi smart bulbs that

If there’s one thing you absolutely need every day, it’s a fast charg