The successor to the long-known BIOS system, dubbed UEFI (Unified Extensible Firmware Interface), serves as your motherboard firmware on every newer computer. Even though most people still call it “BIOS” instead of the proper “UEFI,” the replacement of the previous BIOS (Basic Input Output System) was a necessary step because of the support of 64-bit systems.
There are further advantages: UEFI can manage partitions and hard drives with a capacity of more than two terabytes, supports not only the classic MBR format (Master Boot Record) but also the GUID partition table (GPT) and can handle up to 128 primary partitions — with BIOS there were only four.
UEFI surpasses its predecessor in everyday use. The interface has a modern look and offers several languages to choose from, making it easier to find your way around. This also includes the control of the built-in and connected hardware. In general, UEFI is more convenient to use, because it can be controlled by mouse and not only by keystrokes.
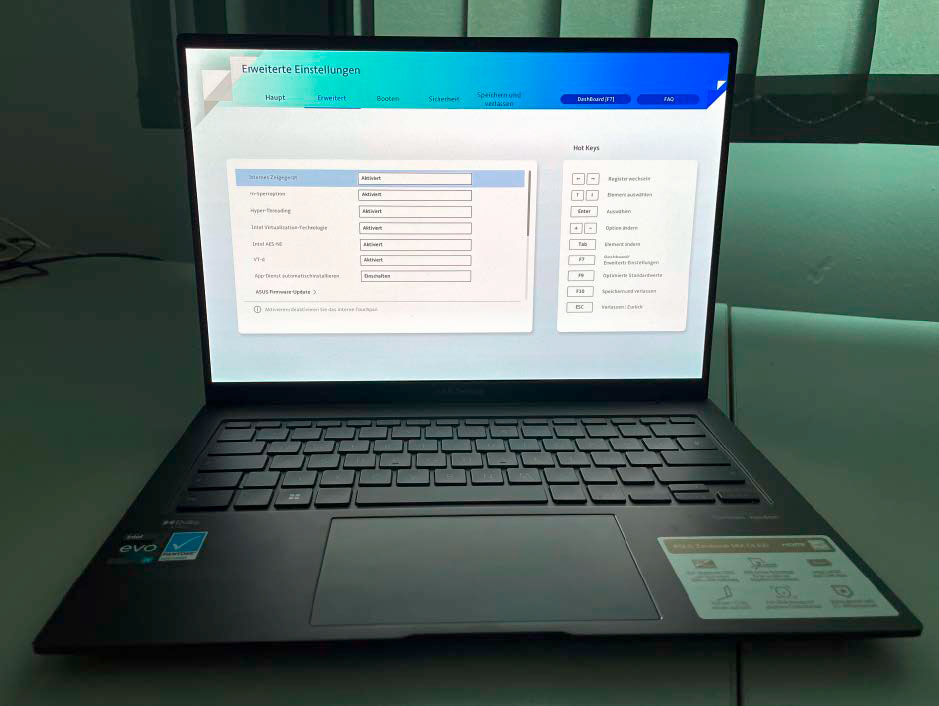
UEFI systems differ from manufacturer to manufacturer. In any case, however, they are clearly laid out, well structured and can be operated by mouse – as here with the Asus Zenbook 14X Oled.
IDG
Gamers who love overclocking have less fear about wading into their UEFI/BIOS and get to grips with it in more detail. They use it to max out their powerful built-in hardware.
It’s also worthwhile for normal users to delve deeper into UEFI. This guide will help you overcome your fear of the BIOS successor. However, there is no one UEFI interface to explain, since the exact system differs significantly depending on your motherboard manufacturer – both in structure and in the terms displayed.
In the article, we use the UEFIs of the Asus Zenbook 14X OLED notebook and the Asus ROG Strix Scar 18 (2023) gaming laptop as examples.
Further reading: The best gaming motherboards
UEFI or Bios: Finding out what your computer uses
Almost all fairly up-to-date computers use UEFI as motherboard firmware. If you are not sure whether your computer uses UEFI or Bios, you can look directly in the Windows operating system. To do this, open the Windows command prompt by entering “Command Prompt” in the search box and clicking on the corresponding app. Type in the command “msinfo32” and confirm it with the Enter key.
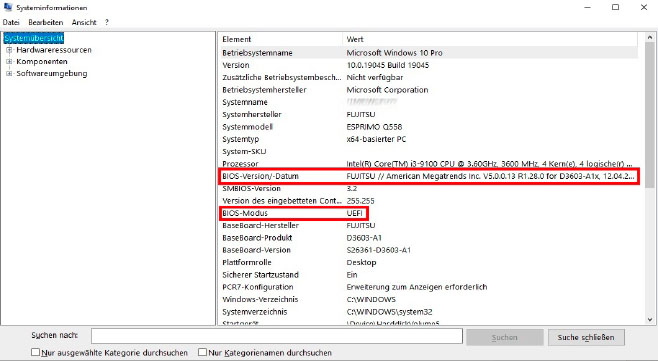
A check in Windows quickly shows whether the UEFI mode is switched on. The system information, which you can also use to find out the Uefi version, provides information.
IDG
This will take you to the system information, which you will now find in an overview on the right-hand side of the window. Look for the term “BIOS mode.” In most cases, you will see “UEFI” next to it. This shows you that your computer is working in UEFI mode. If it says “previous version,” you know that UEFI is not activated. For booting, the computer uses the classic, i.e. legacy BIOS, namely the CSM mode (Compatibility Support Module). It is a kind of compatibility mode that emulates the BIOS within the UEFI.
There is another interesting line in the system information. Look for “BIOS version/date.” Here you can see the version of your computer firmware and the exact manufacturer. You will also get this information when you call up your UEFI.
Using UEFI to discover your components and their function
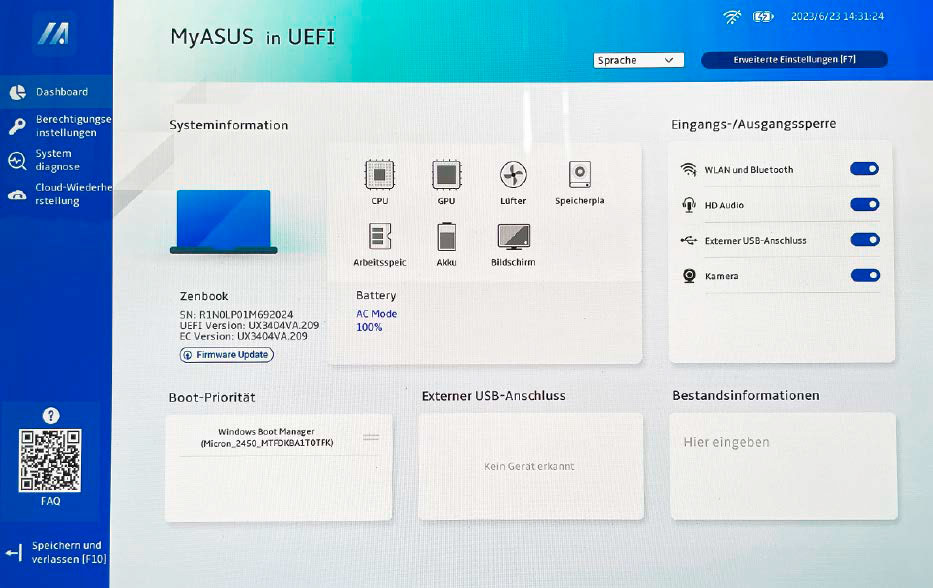
UEFI start pages quickly provide information on the built-in components – such as CPU, GPU, built-in memory or, in the case of laptops, the battery. Integrated benchmarks even make it possible to test components. In addition, basic functions can be switched on and off in many cases – such as Wi-Fi or external USB ports.
IDG
Every motherboard manufacturer in particular, but also most suppliers of complete systems, customize their UEFI interfaces. On every ready-to-use system or notebook, you will also find a UEFI adapted to the computer type. The start page – sometimes also called the dashboard – summarizes the most important facts about your computer in a clear overview. It serves as the first port of call if you are looking for the serial number of the PC or the exact designations for your processor, graphics card, hard drive, and RAM.
In many cases you can also carry out component checks here. This is a good idea if you suspect that something is wrong with a piece of hardware. And it has the advantage that you can exclude possible Windows driver problems in the UEFI and thus concentrate completely on the hardware.
Often, important basic functions can also be switched on and off – such as Bluetooth, Wi-Fi, camera, or audio. If an external drive is connected to the computer, you will find it listed. In many cases, an administrator password can be assigned to increase access security. This is useful for company computers. For home use, you only need protected access if you lend out your computer and do not want the UEFI to be accessible to the outsider.
Update firmware: Update often possible directly in the UEFI

With many complete PC systems and notebooks, manufacturer help tools for Windows simplify the search for Uefi updates. The update itself can often be installed directly in the Uefi.
IDG
You can often install a firmware update directly in the UEFI. In many cases, the UEFI BIOS already shows you an update menu item on the start page. You should carefully consider whether an update is worthwhile. When deciding, it helps to check the update instructions on the manufacturer’s website. Basically, if the computer is running smoothly, there is no good reason to change anything. If something goes wrong during the update, you risk that the computer will no longer boot.
Reasons for an update can be component changes, such as adding a new CPU that isn’t currently supported by your motherboard. At the same time, a BIOS update can also be worthwhile if the update contains new features, eliminates weak points, or increases the stability and performance of the PC. Exactly how the update process works differs depending on the manufacturer. You always need to know the exact motherboard designation and the current firmware version of your UEFI.
For some complete systems and laptops, manufacturer tools help in the search for updates – for example “My Asus” from Asus. Here, the app searches for the UEFI update as soon as you click on the “Support” icon and “Latest” in the “Live Update” area. You then unpack the downloaded update file onto a USB stick and install it directly in the UEFI.
In some cases, the Windows tools of the PC manufacturers also take over the update process. In this case, installing your BIOS update onto a USB flash drive is not necessary. Windows updates can also contain UEFI updates. However, since you cannot be sure whether the firmware update is actually the latest version, it is best to check it. You can usually find them under View update history > Drivers in the Windows Update section of the Windows Settings app.
Optimise newly installed components via Uefi
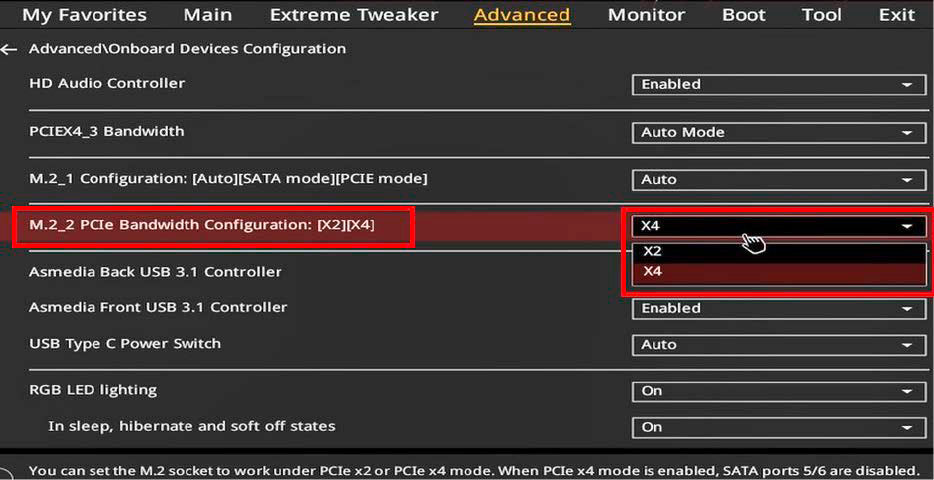
By increasing the bandwidth of the M.2 slot in the Uefi, you increase the performance of the NVMe SSD. Only through this measure can the flash memory reach its maximum speed.
IDG
When replacing components, it is often worth taking a look at the UEFI. Because if the new hardware is ideally controlled by the motherboard can it also deliver maximum performance.
the best pcie 4.0 ssd
An example: On some motherboards, SATA and NVMe have to share the bandwidth in the M.2 slot. If you replace an old SATA hard drive with a new NVMe SSD, the component is recognized as a PCIe device. With some mainboards you even get such a hint during the first reboot after the SSD-UEFI installation.
However, this does not mean that the ideal number of lanes – usually four (x4) – is automatically assigned. Rather, the two lanes (x2) originally sufficient for SATA remain. To change the M.2 bandwidth in the UEFI, you have to adjust the PCIe ports in your BIOS.
You will often find the setting in the UEFI in the “Advanced” or “Extended” area for the corresponding M.2 slot. Change here from “X2” to “X4.” Save the new setting via the “Exit” area. Only after activating the X4 bandwidth can your new NVMe SSD also reach its full performance. At the same time, no more bandwidth is available for SATA.
ErP mode for energy saving and USB control
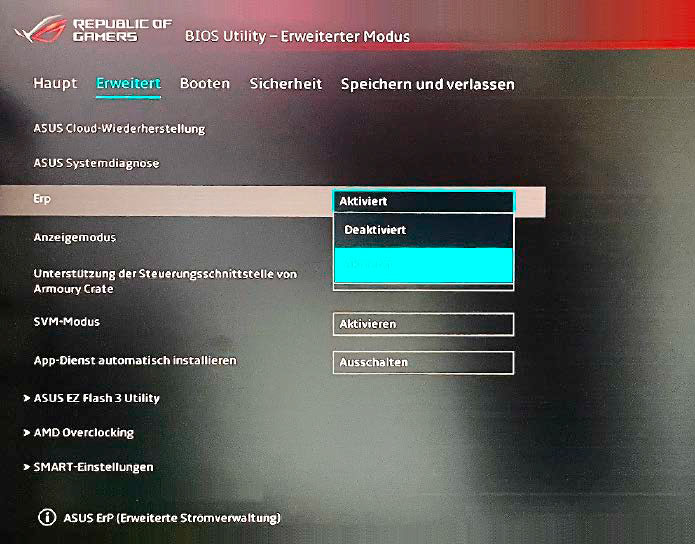
To save power when a computer is switched off, activate ErP mode in Uefi. Peripherals such as USB keyboards or smartphones thus no longer receive power, and power consumption ideally drops below one watt.
IDG
When your computer is shut down, it should draw as little power as possible. An effective means at the UEFI level is the so-called ErP mode. The abbreviation stands for Energy-related Products. The mode implements the European Union directive that stipulates that “energy-related products” require as little energy as possible when switched off. In the case of PCs, power consumption should be reduced to about one watt or less when switched off.
As a rule, the ErP mode is deactivated by default. This ensures that certain activities, such as booting up the computer via your network or keyboard, work. In add
Autentifică-te pentru a adăuga comentarii
Alte posturi din acest grup

I’ve been using Windows for as long as I can remember. It was on the

If you live in a more populated area, you likely check your doors bef


A lot of gamers go to great lengths to find a portable retro gaming d
There’s a common misconception about PCIe 5.0 SSDs that since they’re

Microsoft’s controversial Windows Recall has now been generally relea