Windows users sometimes have the impression that the operating system has a life of its own and does not allow any contradictions.
Some restrictions are intended to ensure the security of the operating system, which is understandable. Regular system updates, for example, are clearly necessary. However, many users would prefer to decide for themselves what and, above all, when something is installed.
In some cases, the blockade can be lifted with on-board tools — and sometimes more easily with tools that we present to you here.
Control Windows updates
Updates are supposed to improve the security of the operating system and fix bugs. Sometimes the opposite is the case and an update paralyzes the computer or individual functions.
Microsoft tries to reduce errors by delivering updates in waves, one after the other. If problems occur, the company can withdraw updates again.
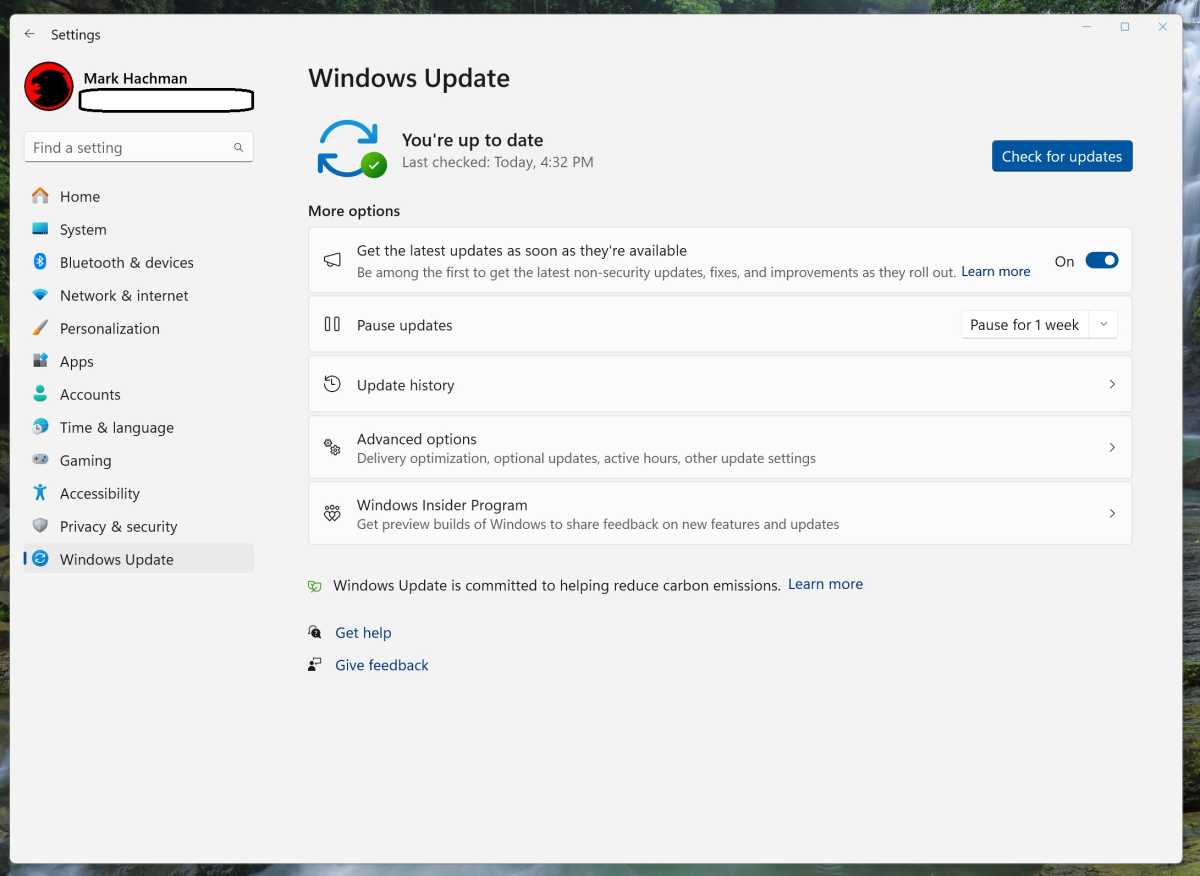
Mark Hachman / IDG
Windows updates are particularly annoying if you want to use the computer quickly after a restart, but then only see the update progress bar.
Reduce updates with on-board tools: Windows offers two options for controlling updates with every edition, but you have to activate them in good time. Go to “Windows Update” in the “Settings” (call with Win+I).
Under “Pause updates” you can stop updates for up to seven weeks. After that, you must install all available updates so that the auto-update can be paused again.
Windows 10 users go to “Update & Security > Windows Update” and click on “Pause updates for 7 days” or, for a longer period, on “Advanced options,” where you can set an end date under “Stop until.”
The second option can be found in the “Settings” under “Network & internet > Ethernet” or “Network and Internet > WLAN.” Activate the switch behind “Metered connection.”
In Windows 10, you still need to click on “Ethernet” or the Wi-Fi connection to see the switch.
However, neither setting completely switches off the Windows update. Security-related updates in particular are still installed, but the total volume of downloads is significantly reduced as a result.
‘Secret’ settings for the Windows update
You can extend the update pause period. To do this, open the registry editor, create the key
Hkey_Local_Machine\Software\Microsoft\WindowsUpdate\UX\Settingsand in it the Dword value (32-bit) FlightSettingsMaxPauseDays with the content
00001c84(hexadecimal). This corresponds to 7300 days, i.e. 20 years, which you can now set as an update pause.
If you want to deactivate the automatic update, create the key
Hkey_Local_Machine\Software\Policies\Microsoft\Windows\WindowsUpdateand in it the Dword value
NoAutoUpdate with the content 1. Windows then automatically downloads no or only a few updates, but you can initiate the download at any time under “Windows Update” by clicking on “Check for updates.”
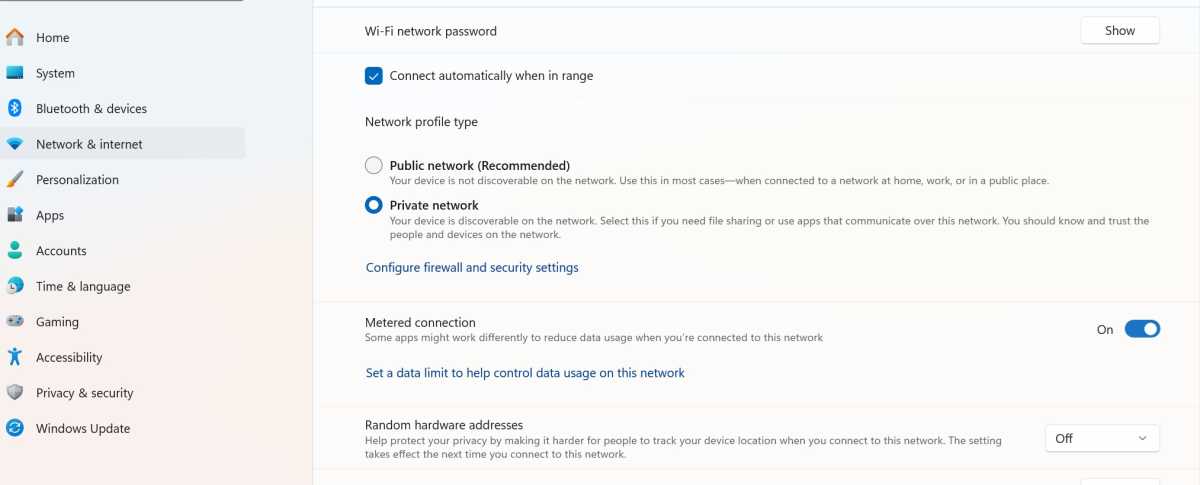
Reduce updates: Configure the Internet connection as a “Metered connection.” Windows will then only download security-relevant updates.
Foundry
Disable Windows updates completely: If you really want to switch off Windows updates completely, use the Windows Update Blocker tool. Select the “Disable updates” option and click on “Apply now.”
The tool deactivates all services that are responsible for updates and ensures that they are not reactivated. Only deactivate the Windows update if it is actually necessary.
Once you have reactivated it, you should install all missing updates as quickly as possible.
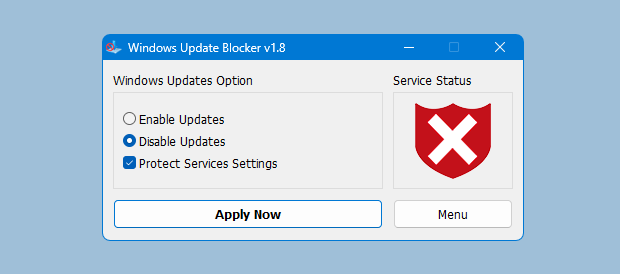
Temporarily do without all updates: Use Windows Update Blocker to switch off the update function to prevent disruptions caused by updates.
Windows Update Blocker
Defuse Microsoft Defender
Virus scanners are often unable to recognize malware beyond doubt. To be on the safe side, the protection software warns of anything that could be potentially dangerous.
This may be software that is categorized as dangerous simply because it has been downloaded from the internet and is not (yet) known to the virus scanner.
In principle, there is little to criticize about this procedure. The virus scanner protects most Windows users from harmful email attachments or the download of malware. However, experienced users are often hindered by the start prohibitions.
Partially deactivate Microsoft Defender: Only carry out the following actions if you are sure. If in doubt, check a file at www.virustotal.com for malware and get a second opinion.

Paralyze the virus scanner: Disable real-time protection to allow you to start programs that Defender mistakenly classifies as malware.
IDG
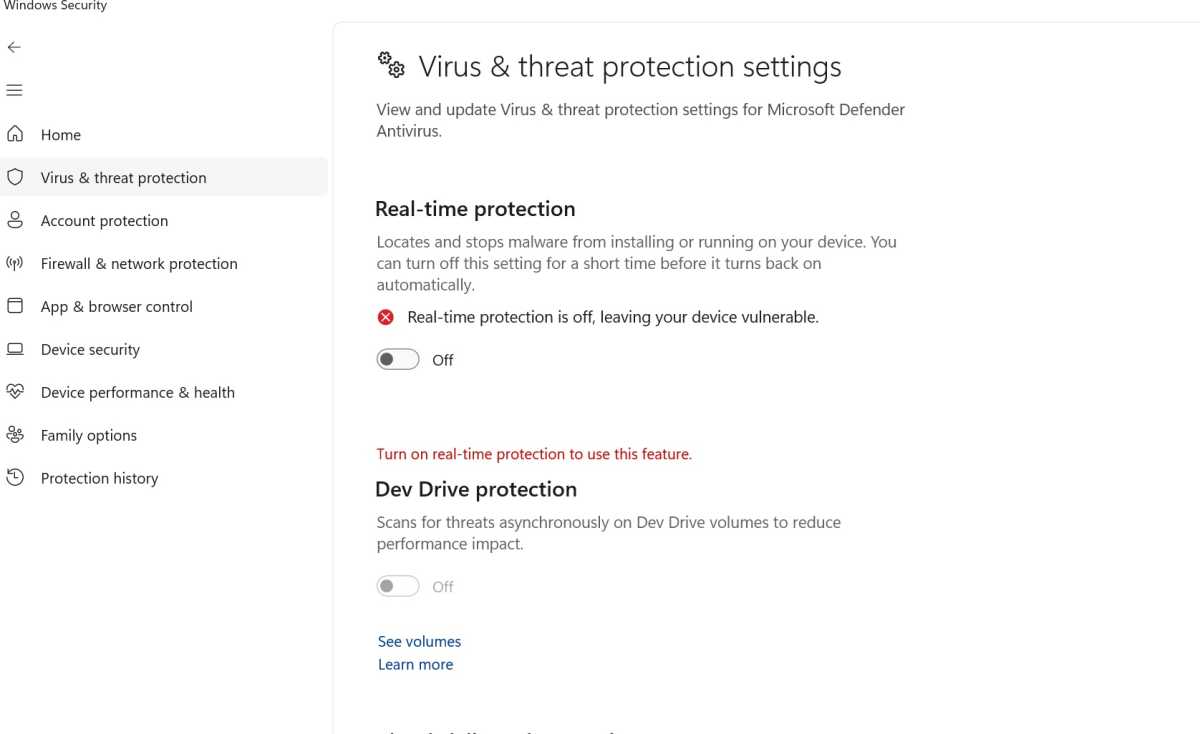
If Microsoft’s antivirus protection reports when you download or start a program, go to “Privacy & security” in the “Settings” and click on “Windows Security.”
Continue with “Virus & threat protection” and click on “Manage settings” under “Virus & threat protection settings.”
Here you can deactivate “Real-time protection,” which means that Microsoft Defender will no longer scan new files. Windows does not remember the setting permanently and automatically reactivates real-time protection after a while.
Under “Exclusions” you can click on “Add or remove exclusions” and “Add exclusion” to specify files and/or folders that the virus scanner should not scan.
This is recommended, for example, for the project directories of development environments or folders in which you download files that Microsoft Defender prohibits.
Prevent virus scan: Add a folder to the exclusions if you do not want Microsoft Defender to scan the files in it.
Foundry
Configure Microsoft Defender more easily and quickly
The settings under “Windows Security” are not particularly clear. The free Defender UI tool has set out to improve this.
When you start it for the first time, select the language at the top of the window. The tool shows several security profiles and you usually select “Recommended.” The details can be found in the descriptions.
Click on the “i” in the settings to obtain explanations of the effects. On the “DefenderGuard” tab, you can specify the time period until automatic reactivation before “Real-time protection.”
Use the Defender Exclusion Tool to quickly configure the exception list. Use the button in the toolbar to specify a folder that you want to exclude from the virus scan.

Configure Microsoft Defender more quickly: Defender UI offers a clear interface where you can quickly find the most important settings.
Defender UI
Defender Control can disable Windows security completely. However, Windows understandably does not allow this: Software that wants to switch off virus protection is immediately classified as a threat.
You should therefore add the folder in which you unpack the tool to the exclusion list. The download from the manufacturer is protected with the password sordum, which you enter when unpacking. Otherwise, the virus scanner would immediately remove the tool if real-time protection is activated.
However, you must still deactivate real-time protection manually before starting the tool, as described above. In addition, set the switch under “Tamper protection” to “Off” in the “Virus and threat protection settings.”
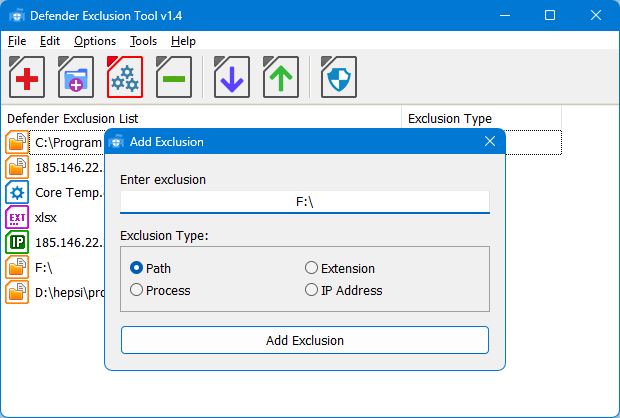
Edit the exclusion list more easily: With Defender Exclusion Tool, you can quickly add files or folders to the list that the virus scanner should not scan.
Defender Exclusion Tool
Once Defender Control has been started successfully, first go to “Menu > Add Defender Control to the white list.” The tool is then ignored by the real-time protection.
Use the “Disable Windows Defender” button to switch off “Virus & Threat Protection” completely and click on “Enable Windows Defender” to switch it on again.
Configure Smartscreen filter and A
Autentifică-te pentru a adăuga comentarii
Alte posturi din acest grup

What’s one thing you can never have enough of? USB-C cables. If you’r

As a federal antitrust investigation into Google’s Chrome browser wra

If you’ve been looking for a fantastic deal on a solid budget laptop,

Here’s a conundrum our household of Philadelphia Eagles fans has freq


I’ve realized that it’s impossible to buy an office chair without the

Microsoft OneNote has been one of the most popular note-taking apps f